Vantage Pro2 Sensor Installation
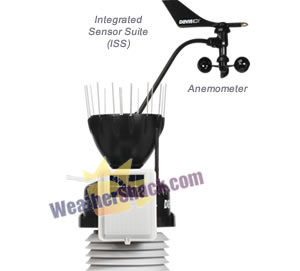
The Vantage Pro2 is easy to install and can make for a fun outdoor project. The included instructions are very detailed and easy to follow. The outdoor sensor is comprised of two parts: The Integrated Sensor Suite (ISS) and the anemometer.
The rain collector, temperature sensor, humidity sensor, transmitter, solar panel, and other electronics are all located on the ISS.
The anemometer and the main part of the ISS can be installed either together (as is seen in most of the pictures) or apart from each other. Hardware is included to attach either unit to a pole or to a flat surface (see below for more details).
The anemometer comes with a 40' (12 m) cable for flexibility in configuring the system to monitor wind conditions. For example, the anemometer could be mounted at the highest point of a roof, and the ISS could be mounted on a fence closer to ground level. To ensure accurate wind direction readings, the wind vane must be oriented correctly. Detailed instructions are included.
 |
Locating the ISS and Anemometer
For the weather station to perform at its best, you should consider the following guidelines to select the best mounting location for the ISS and anemometer. Be sure to take into consideration ease of access for maintenance, sensor cable lengths and wireless transmission range when siting the station.
Note: When selecting a location for installing your ISS, especially on a rooftop, make sure it is a location far from power lines and electrical wiring.
General ISS Siting Guidelines:
- Place the ISS at least 6' (2 m) away from sources of heat such as chimneys and exhaust vents.
- Avoid placing the ISS near or above any object or area that collects and radiates heat in the sunshine. This includes paving, deck, metal, or concrete structures.
- Ideally, place the ISS 5' (1.5 m) above the ground in a grassy area.
- Avoid locating the ISS in an area that is prone to precipitation runoff and look out for trees and nearby buildings.
- Site the ISS in a location with good sun exposure throughout the day, if the ISS is wireless or includes a solar radiation or UV sensors.
- Mount a Wireless ISS so that the solar panel receives the maximum amount of sunshine available at that location.
- For agricultural applications, install the ISS and anemometer as a single unit 6.5 feet (2 m) above the ground. This is especially important for evapotranspiration (ET) calculations.
Anemometer Siting Guidelines:
- For best results, place the anemometer above local objects that obstruct wind flow.
- If mounting on a roof, mount the anemometer at least 4' (1.2 m) and ideally 10' (3 m) above the roof line.
- The standard for meteorological and aviation applications is to place the anemometer 33' (10 m) above the ground. Most home users don't meet this standard but can still enjoy basic wind readings.
- The standard for agricultural application is to place the anemometer 6' (2 m) above the ground. This is important for evapotranspiration (ET) calculations.
Note: For roof mounting, and for ease of installation in other locations, Davis recommends using the optional Mounting Tripod #7716.
Optional: Anemometer Cable Length Considerations
All Vantage Pro2 stations include a 40' (12 m) cable to go between the ISS and the anemometer. This can be extended up to 540' (165 m) using optional extension cables. If most of the anemometer cable length is unused, the coiled cable length can be stowed once the anemometer and ISS have been installed on a site. Attaching the anemometer cable to the mounting pole using the supplied cable tie is the recommended option.
- The Cabled Vantage Pro2 includes a 100' (30 m) cable to go between the console and the ISS. This too can be extended up to 1000' (300 m) using optional cables.
- If you would like to mount the anemometer separately from the ISS and would prefer not to run a cable back to the ISS, this can be accomplished using the optional Anemometer Transmitter Kit.
Optional: Wireless Transmission Considerations
The range of the radio transmission depends on several factors. Try to position the transmitter and the receiver as close as possible for best results. Typical maximum ranges include:
- Line of sight: 1000 feet (300 m).
- Under most conditions: 400 - 600 feet (120 - 180 m).
- Range may be reduced by walls, ceilings, trees, foliage, a metal roof or other large metal structures or objects such as aluminum siding, metal ducts, and metal appliances, such as refrigerators.
- Frequency interferers can also reduce transmission distance.
- Transmission between wireless units may be obscured by something unidentifiable, or by some obstacle that cannot be worked around.
- For better reception over greater distances or for weaker signals, consider using a Wireless Repeater (product #7626 or #7627) to strengthen the signal or increase the distance between your ISS and the console.
After a suitable place has been found for the wireless ISS, it is very important to test reception from the installation location before permanently mounting it there. Instructions for testing are included with the product.
Installing the ISS
As stated previously, the anemometer and the ISS can each be mounted on a pole or to a flat surface. Use the U-bolts to install the ISS and anemometer together or separately on a pole. Use the lag screws to install them separately on a flat, vertical surface.
General Guidelines for Installing on a Pole
With the supplied U-bolts, the ISS can be mounted on a pole having an outside diameter ranging from 1-1/4" to 1-3/4" (32 – 44mm).
Larger U-bolts (not supplied) can be used to mount to a pole with a maximum outside diameter of 2-1/2" (64mm).
To mount on a smaller pole, obtain a U-bolt that fits the base openings but that has a shorter threaded section. If mounting the ISS on a smaller pole with the included U-bolts, the bolt interferes with the rain collector cone.
Accessories for Pole Mounting
- Use the Mounting Tripod #7716 for easy roof-mounting.
- The Mounting Pole Kit #7717 can raise the installation height of the ISS by up to 37.5".
Most of the content on this page was compiled from the Outdoor Sensor Suite Installation Manual. You may want to reference this manual if you require more information.


Our Customers Say